Can’t sleep..

Good evening everyone,
I have officially hit the stage of pregnancy where I’m uncomfortable about 90% of the time.
All I want to do is sleep, I can’t believe the exhaustion I’ve experienced this time around, that typically resolved itself after my first trimesters in previous pregnancies. I’m so tired in fact, I have close to no motivation to do anything, when things don’t get done (like laundry) it piles up (I know most of you can relate to that!), it’s an extra chore for the following day. I keep telling myself each day “tomorrow you will get a second wind, you won’t be so tired so you can play catch up” well guess what?! many tomorrows have come and gone and I’m not feeling relief from exhaustion.
Hip pain is another thing I really struggle with during pregnancy and it seems that the pain comes earlier and gets more severe each pregnancy. Unfortunately the pain is so bad this time it wakes me at night and keeps me from getting the sleep I need. Then I look around, see I have nothing done that I should and get panicked, calm myself down and start all over again the next day. It’s a vicious cycle each and every day for the past few weeks. I know the pain won’t get better till baby Girl gets here, I know I’m going to be just as exhausted when she’s here as I am now but somehow once the baby arrives it all feels worth it somehow. I’m getting anxious to meet our previous girl. The miracle of life is just astounding, I love babies so much and admiring their perfect tiny features that God so delicately put together. I still have about 7 weeks so hopefully they come quick cause I’m ready 💜


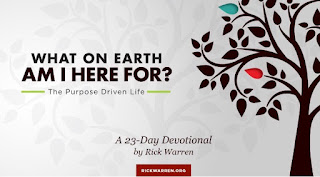
I’m working on a bible study on my you version app, anyone who does not have this app needs this app immediately. 😊 the study is called Live Your Calling:What On Earth Am I Here For? The past few days have been spot on what I needed to read to give me the extra push or motivation to complete the day.  The following verse has always been one of my favorites as anxiety is no stranger to me, I constantly remind myself to cast my anxieties on him because he cares what I’m dealing with, he cares about me my inner most self and doesn’t leave me to struggle alone.


There’s so much comfort knowing I’m not facing my anxiety alone. So much comfort in knowing almighty God goes through every part of life with me. He knows my struggles better than anyone else including myself. He created me after all and has a plan for my life. In my study, Rick Warren explains Gods plan for your life like this “life is not a series of random freak accidents. Life is not totally unplanned. Life is not without meaning. God knows what’s going on. He’s weaving the tapestry of your life and it has light and dark threads -happy and sad times- to give richness and texture and color to your life.”
Wow, right?! 
I’ve always known God has a plan for our lives but sometimes it takes a pretty analogy for my simple human brain to be reminded of the amazing-ness of God. 
The author goes on to explain God does not cause pain and suffering but does allow it because it has a purpose. I can’t pretend I know God’s purposes for my pain or know what his plan is for your pain and sufferings I can’t even promise you will know today or tomorrow or next year what the plan was for the pain and suffering but I do believe when we get to heaven we will see the purpose God had for us. Sometimes even in this life, as my dad explained to me, “we see little pieces of the puzzle in Gods plan, sometimes not even a whole piece of a puzzle is revealed, but those little pieces of the puzzle that he allows us to see are mind blowing!”  For now, I speculate how I think my struggules can be used for good. I believe, as people, we like to be understood. It’s nice to go through life with someone who understands what you’re going through. That’s why I share my struggles on this blog. If I can help one person not feel like they’re the only ones going through anxiety and they receive comfort from my sharing that’s a good thing! If a first time Mom has extreme hip pain and none of her friends have experienced that but she comes across this blog and gets some kind of encouragement, that’s a good thing! I truly do love people and if words help you or you need a listening ear I’m your girl.
I do enjoy people and sharing with others how God has worked and continues to work in my life even if it reaches just one person I’d say it’s worth it. 


Creamy Garlic Noodles

Hello!!
I hope everyone has had a great Monday, welcome to another week!
I am sharing one of my families favorite side dishes with you all.
I’m 33 weeks pregnant now and definitely feeling exhausted with little to no motivation to meal plan, which is kind of sad because as a stay at home mom meal planning and cooking is one of my favorite jobs!
I’ve started asking my 5 year old, B, for specific requests that I can incorporate into the week.
Yesterday B asked for a baked breaded chicken with her favorite noodles and a side salad with her favorite dressing. Easy enough and she doesn’t normally request an entire meal she will usually say either a main course or a side but this girl had a full dinner in mind so I decided to make exactly what she asked for.
These noodles are a big hit in my house including with my 23 month old who is my picky eater, she had 2 helpings tonight!

Anyways, one of Bs favorites (and mine) is Alfredo but we both agree these noodles are better, these noodles are light, not heavy like Alfredo but packed with delicious flavors.
One of my favorie things about this dish is it's a one pot and done you don’t even drain the noodles! So great! (Especially with a non working dishwasher for 5 weeks now!!! Grrr😡)

To start, I put 4 tablespoons of butter into a pot. I don’t recommend a saucepan, I’ll explain why later.
Place the pot on medium low heat so it starts to melt while you get 3-4 cloves of garlic minced. I like making my garlic super small because I don’t like biting into a huge chunk of garlic. If you don’t mind big chunks then by all means go for it! I’m all about taking recipes and making it your own. 😊


I thought this was one HUGE clove of garlic, so I took a picture of it next to my butter knife for scale... BUT it turned out it was 3 🤣


Chopping up my garlic cloves 


                                         Here’s my garlic cooking in my butter, smells so yummy!


While my Garlic simmers in the butter I get my chicken stock ready, you can use whatever kind of broth you want. You need 3 cups, if you’ve read my previous recipes you know I prefer using bullion and water instead of a carton. Just my own preference, either is fine though.
In this particular recipe I’ve used both a carton of chicken broth and using bullion and water and it truly tastes better making it with bullion.
So keep the butter and garlic on a low to medium low heat watch it carefully, DO NOT let the garlic brown!
I took 1.5 cups of water in my microwave safe bowl, and added 3 cubes of bullion.
 I then put the bowl into the microwave on the beverage 8oz setting. This doesn’t quite dissolve the cubes but softens them.
Once that’s done I use a fork to break up the cubes a bit and pour it into the pot with an extra 1.5 cup of water.
*note: 1 cube per cup of water is typically the ratio I use for chicken broth*

I then turn the heat to medium high, once the water is boiling add 1/2 pound of spaghetti or angel hair. This equates to about half a box.
 I break my noodles in half to make it easier on my 23 month old otherwise I prefer leaving them long.
You want the noodles to stay boiling at a slow boil, this is why a saucepan isn’t ideal as it’s too crowded and will boil over.
I cook mine for about 15 minutes stirring occasionally so the noodles don’t stick together.
After 15 minutes most the broth will be absorbed into the noodles.
DO NOT DRAIN!
I then add about 1/4 cup shredded Parmesan cheese into the pot and stir until melted, this also thickens up what’s left of the broth into a sauce.
I also added a splash of milk (a literal splash, if I had to guess 1/8 cup)


Sprinkle some parsley and parm if you’d like to and voila! Easy DELICIOUS side item 😊

Here’s my picky 23 month old K enjoying her noodles 
  

She’s figuring out how to slurp noodles and loves to practice her skill 🤣

I hope you all enjoy this recipe, feel feee to comment any questions or suggestions! Thank you all so much for reading and following 💜

Ingredients: 
4 tablespoons of butter
3 cloves of garlic
3 cups of chicken broth
1/2 lb (1/2 package of spaghetti or angel hair pasta) 

Directions:
In a large pot melt butter over medium low heat, add minced garlic cloves and keep a close eye on the garlic so it doesn’t brown. 
While garlic and butter simmer together for about 2-4 minutes get 3 cups of chicken broth ready. Since I use bullion cubes this is where I heat 1.5 cups water in microwave with the 3 bullion cubes. 
Add you chicken broth (and in my case remaining 1.5 cups water) 
Bring to a boil
Once boiling add pasta
Keep pasta at a gentle boil stirring occasionally for 15 minutes 
Once cooked there will be broth remaining DO NOT DRAIN! 
Remove from heat 
Add 1/4 cup shedded Parmesan stir till melted 
Add splash of milk or cream
Top With sprinkle of parm and parsley
Serve right away


Life this week...broken dishwasher rant

It's my favorite time of the year, the weather is finally cooling down in the West Phoenix area, and this year I am NOT exaggerating when I say "FINALLY". We've been in the Phoenix area for 3 years now, but we've only been in the area we are in now for 1 year as of November. I've come to find that everyone seems to argue about whether it was this warm last year, this cold, this dry, did it take this long to cool down?! etc...
When you're new to an area though things tend to stick out more from previous years.
For example, I remember when we moved the middle of November last year, within a couple weeks it was raining and storming and cold. I distinctly remember trying to find our winter clothes and remember pulling winter bins out to put away in closets first. I also remember discussing with my husband on whether or not we should turn the heater on for the cold nights.
So I believe I have leverage in these arguments because, naturally, I'm correct ;)


These next two photos were from last year.... we were FREEZING and that was end of November. We are now in December and are just staring to get  cold, I promise 😁


See?! Matching winter boots!!!

Ok, I’ve said my piece and provided photographic evidence 😂


Anyways, most people say that December is the busiest time of year. While I typically agree with that, I've noticed I haven't crammed us packed with the usual festive activities. I just looked at our calendar and thought "huh, that's pretty empty for December". I think I'm just tired and lack the motivation to make too many plans because honestly, I'd rather sleep.
Most of you know we are expecting baby number 3 in January, this pregnancy has by far made me the most tired, most depressed and most sore than the others. I've also found that here in my last 8 weeks for pregnancy I'm feeling much like I did in the first trimester, I have excessive nausea, I'm so tired, achy, and moody. I feel a bit disconnected and that's my own fault!
For anyone who's dealt with this you know what I mean, I've secluded myself and it's silly! I do think it helps once I become aware that I've secluded myself, It happens so fast that I don't always realize it's happening until I feel the dreadful depression. Once I become aware, I can start helping myself get out of the depressed state thankfully. I love blogging to keep me busy and honestly last minute plans to get together with friends has been very welcome this week 😊

Even with a semi-empty calendar we still seem so busy. B always has something going on with school, K's naps have been all over the place as far as when she's going to sleep and how long she sleeps for. Possible what makes us seem busiest of all is that our dishwasher has been broken for a month. Yes, A MONTH! This dishwasher is under warranty, so it's been serviced every week sometimes twice a week and the technician keeps getting "defective parts". It's SO ridiculous! Today he serviced the dishwasher again and again had a defective part so still AGAIN our dishwasher is not working. Our technician is does not seem to be at fault, he suggested speaking with customer service and ask that they replace the machine altogether. So I guess that's our next step which I'm going to have to do tomorrow. SO for 5 weeks I've been dealing with the warranty company, been on the phone for what feels like hours each week, I have to clear my schedule each day they decide they're going to come and service the machine and then repeat again the next week. It's become rather exhausting and very frustrating. It will be so nice having a working dishwasher again, if it ever works again that is! Just an example of how bad my hormones are I have cried last week and this week over the darn dishwasher!


I miss you dishwasher 😩

Melted Crayon Ornament....FAIL!

Today I'm showing you a DIY Christmas ornament FAIL :(
Most the time I do a craft or DIY project and I'm super proud of it and impressed at how well/easy/quick etc. it worked. Yesterday, I posted about my super successful felt tree for my girls. Make sure you check that out if you have little ones.

So, I have used clear ornaments in the past to make super fun glittery ornaments or painted ones. And I have ALWAYS had great luck with the clear bulbs and love how diverse you  can make them.
I will do a tutorial on that soon as my current clear Christmas ornament project was a flop, but first, the flop!

So I read a post somewhere about melting crayons in a clear Christmas ornament to give it a marbled look. I didn't look up a tutorial as it looked easy enough, maybe that's why this wasn't a success...hmm

I thought this would be a super fun project to do with my 5 year old B. She's super crafty and loves doing projects with momma, so we decided to give it a try while K napped one day. The previous day I had B look EVERYWHERE for crayons that were wither broken, not with an art set or current Crayola box. I gave her a Tupperware container and she hunted for mix-matched, broken crayons.

Once the crayons were collected we got to work peeling off each and every wrapper.
By the way, if you haven't unwrapped crayons in the last couple years, these are not as easy to peel off as they were when I was in school.
You used to be able to press on one end of the crayon and the wrapper would eventually slide up and off the crayon... yeah, not anymore! These suckers are GLUED on now! It still wasn't too "HARD" peeling them off, but it definitely took time, and was hard for B to do on her own. So I would find the seam, and slide my nail under it to break the seal then let her unwrap. Otherwise there were tons of teeny tiny paper rips everywhere from her attempts.
Here's what the finished container of unwrapped crayons looked like


We planned on making each of her good friends their very own ornament, so I asked her who she wanted to make one for first and what colors she wanted to use. The first friend she chose was a little girl and she wanted to use pink and purple in her ornament. I took one pink and one purple crayon, and with a chefs knife cut them in half. I then began chopping the crayons as fine as I could. 
This process was extremely messy, I used a cutting board but little shard of wax were flying everywhere! Anyways, I chopped up half the pink and half the purple, then put the shards (as best as possible) into the clear ornament. 

I KNOW I took pictures of this messy process but now they aren't on my phone... so? KIDS? that's easy to blame them ;)

Next came the blow drying.
Guys, I have natural curls, I RARELY use a hairdryer, and when I do it's on low heat. My blowdryer does not have the capability of getting as hot as most do, but blowdrying the ornaments was HOT. I was burning my hands, hence the oven mitt. B and I tried really hard to work together but she ended up not being able to do much. 
When you put the shards of crayon into the bulb, obviously it's all pulled to the bottom, cause, gravity :)
So I mostly blow dried the bottom of the bulbs and GUESS WHAT HAPPENED?!


THE TOP of the bulb melted!!!! 
I'm still baffled at how this happened when the heat was pointed at the BOTTOM of the ornament!
Once this happened I was done, I quit!
it was a lot of work, a lot of mess just for my bulb to melt!
Now, I know what you're thinking "hello, GLASS ornament, not Plastic...?!"
I chose plastic because my 5 year old was going to be holding and assisting and she would've been heart broken if she dropped one and it shattered. I'm sure had I used glass it would not have melted BUT glass gets HOT too! 
It was very hard to hold the round, smooth, Hot ornament. it would not have been easier holding glass... 

Here you can see my melted ornament :( 
The colors all melted and marbled together looks pretty but it just wasn't work the hassle in my honest opinion


Here's the ornament she was going to make for a little boy she's friends with but...I haven't been in the mood to even attempt this one :(
We will DEFINITELY be using the leftover bulbs to make painted ornaments, I think I will be able to get those a marbled effect so stay tuned, that post will definitely be up by this weekend!!

Thank you to all my readers so far! I'm loving seeing more new followers each day. 
ALWAYS feel free to comment suggestions!


Felt tree

Hi everyone!
I have been working on some projects and ideas to share with you.
I’m so excited for this post!
We got our tree put up and decorated the day after thanksgiving, it would have been up sooner but I haven’t won the argument with my husband...yet! But I’m working on it. You’d think by now I’d know not to ask first and just start slowly decorating here and there. ANYWAYS, we got out annual Hallmark Christmas ornaments. James and I started a tradition when we were engaged to buy a special ornament every year. So we all go to the hallmark store and choose an ornament.
K got to really choose for herself this year, it was so cute seeing her little face light up as she said “wow!” To each ornament and then lovingly squeezed the Finding Dory ornament we brought home.
B chose an Elsa ornament it took her FOREVER to choose, and she is way past the Frozen obsession stage. I think she chose Elsa because the cape is cloth and not plastic like the rest of the ornament. Haha she cares way more about “fashion” than Frozen and she thought that cape was super fashionable. Silly girl
Once the tree was decorated sweet K decided she wanted to keep taking ornaments off and replace them elsewhere. This was never an issue with B, who was content just looking and not touching the tree, but that is not the way of our sweet K.
Years ago, I saw the idea of making a tree for toddlers to decorate and redecorate so they wouldn’t break the fragile ornaments on the real tree. I thought it was so cute but never did that when Brielle was a toddler. Seeing K have a hard time leaving our tree ornaments alone I decided to make her and Brielle a felt Christmas tree to play with as they wish.

I bought 1 yard of green felt to be the tree, I had my sweet husband cut it out for me so I could get to work on tracing the ornament shapes.


For the ornaments I used cookie cutters and a couple random shapes from Ks toys to trace the shape on the small sheets of felt I had. I figured this is a good way to work on our shapes and colors with K.
 So I wanted familiar shapes along with the “christmasy ones”.

I’m not the best at cutting, it pretty embarrassing how terrible I am at it. As I was cutting the ornaments I realized keeping a black outline on the ornaments actually looked better than trying to make a clean cut.


I think you can see in this picture how much better the shape looks with a little outline verses without one. And I couldn’t resist drawing in on the snowmen. They’re so CUTE!


Once I had everything cut out it was time to hang up our tree. I used command strips to hang ours. I thought I bought the Velcro ones but I mistakenly bought the sticky ones 😞
I tried the sticky ones anyways which only lasted about a week before losing the stick. You know, from the felt sticking to the stick and not the whole felt tree... so I recommend not using the sticky command hooks. Hoping the Velcro works better! If it doesn’t I will definitely let everyone know.

Here’s what it looks like all done!


Super easy to make and the girls love it! The only thing I may change/ add is lighter colored ornaments. You can’t really tell the difference in this picture but there are pink and red  ornaments. They’re just too close in shade so I may pick up some more lighter colored felt to add to our tree. For now the girls love this one. I’ll have to post a pic of K with the tree another day. She refused to wear anything but a diaper on this particular day and I’d prefer her fully clothed for blog posts 🤣

Sausage and Noodle recipe. HELP ME NAME MY RECIPE!

Hello! I wanted to share with you one of my family's favorite "go-to" meals.
This is an easy one to make and usually our go-to on weekends when we can't agree on something for dinner but also don't want to spend money on ordering out.

**I do not have a name for this recipe yet! Comment with name suggestions :)**


First I start with 4 cups of water in a pot, with 3 bullion cubes on med-high heat.
I purposely don't add 1 cube per cup as typically suggested on the back of the bullion container as the sausage in this recipe plus broth can be too salty.


While I'm waiting for the broth to boil, I get my sausage and cut it up,
This is the kind of sausage I like to use,
All I do is slice this up and add to a skillet on med-low heat


Next I get out a few peppers,I like using the mini peppers because my girls aren't big fans of peppers so I've found these mini ones are easier to cut super thin and hide (hide... in theory),
They're smaller so there are less seeds which makes it easier to clean out,
I also think these are slightly sweeter than typical bell peppers.
I get terrible heartburn during pregnancy and I've found that for some reason these don't aggravate the heart burn like regular bell peppers. Doesn't make much sense, maybe it's psychological but whatever works!


 My water has started boiling so I add half a box of thin spaghetti.
I know this sounds crazy, 1/2 a box to only 4 cups of broth??!!... TRUST ME!
The noodles will completely cook in this broth without needing drained, just go with it


 I've got my peppers sliced nice and thin, and add them to the pan with the sausage, I turn up the heat                                                                           to medium


 Once the sausage starts cooking it begins caramelizing, which makes the bottom of the pan sticky.
I scoop out 1/4 cup of broth from my pot of noodles and add it to the sausage so the sausage doesn't                                                          burn and get my pan all messy.
           When I stir in the broth I sometimes find I need a little more so I add another 1/4 cup


After about 12 - 15 minutes the noodles will be completely cooked. 
As you can see there's still some liquid but not a whole lot, 
DO NOT DRAIN the remaining liquid!


Put the noodles into the pan with the sausage and peppers, 
Get it all stirred in, 
Then I add a splash of milk, 
I should have measured but I get into my groove where I end up tossing a little of this or that into a dish and forget to get exact measurements. 
When I say a splash of milk I mean a splash, like maybe 1/8 cup.
This is optional, I find it makes the very light (barely there) sauce just a tad creamier. 


That's really it! An easy, delicious and filling meal.
Sometimes we add a sprinkle of parmesan cheese, If I know we are going to do that I add even less bullion so the dish isn't over salty.


Don't forget to comment with a name suggestion for this yummy recipe!
I understand if you need a few days to go prepare it for yourself to experience the yumminess before suggesting a name ;)  

How to do Cindy Lou Who Hair

   Today B's school had their annual read-a-thon, this is a way the school raises funds for new books. The students have a few weeks to get pledges from friends and family then when its the day to turn them in (read-a-thon) they have a fun day of reading.
What's really fun is the whole school gets to dress up as a children's literary character of their choice. It's a bit of a friendly competition as classes with most participation, monetary donations and donated books win prizes, the most creative, original, and best costume also wins a prize.
It is a really neat way the school raises funds and the whole school from students, teachers, administration and parents get involved.
  
  Well this is my B's first year and she decided she wanted to be Cindy Lou Who from
How the Grinch Stole Christmas.
I nearly squealed when she said that's what she wanted to be, as Christmas is my absolute favorite time of the year!
I also love that she chose something on her own, I gave her some suggestions of things I could think of like Madeline, Pippi Longstocking, a mouse, a princess, Cindy Lou Who, Mary Poppins etc. She ended up choosing Cindy Lou Who which I thought was fantastic for a few reasons; there was room be creative, she didn't choose a character based on her friend's influences, as a few of the girls had told her what they wanted to be and I knew it would be a fun costume to put together.
She even kept it a secret from her classmates until a few days before read-a-thon!
She came home saying so and so "is going to be Charlotte from Charlotte's Web" so and so "is going to be Belle"... "But I didn't tell them mine because I don't want them to like my idea so much they use it, so I want it to be a surprise"... smart girl!

  The first thing I looked up inspiration for on pinterest was Cindy Lou Who hair.
I mean the hair really makes the costume, but how in the world do you get all that hair to stick up?!
I watched a few tutorials, and took some inspiration from each one, I did not copy any one idea.
The reasons just one tutorial didn't work is all the tutorials I saw was on adult hair, one lady had extremely long hair, another had natural curls, and another had short hair.
So I played with a few inspirations a few days prior and settled with some tweaks that worked best for her hair


Here we go with how I did B's:
It's a little hard to see in this picture but I basically sectioned off the top half of her hair and split it into 3 sections with the middle section being a little smaller,
the middle section is sticking straight up ,
I used a hair tie on the back section so it wouldn't get mixed in with the back half of her hair, 
the front section is just hanging out in her face...


 I cut a one liter coke bottle in half, I did this based on the length of her hair,
When I had done a trial run a couple nights before I decided a whole liter bottle was too big,
I tried a cup which worked well I just didn't know how to make it stay,
So I decided I would use a bottle and as a way to reinforce it, feed some of her hair through the bottle
So that middle section is what was fed through the bottle as you can see in this picture..


Once I fed the hair through the bottle, I picked up the front section of hair and began covering the front and sides of the bottle,
You don't want the bottle showing at all,


 Then, I took out the hair tie from the back section and began using the hair to cover the back and sides of the bottle,
I used a little detangling spray in the front to smooth down some of the frizzies, and combed that up,


 Once the bottle was covered with her hair I put a hair tie at the neck of the bottle,
Securing the top of the hair to the bottle,
the hair will flow over and down kind of like a fountain which is fine you'll curl that later.


 I did not get a good picture of how a parted the back of her hair so here's a picture of the back once it's done,
Just trying to show you I split the back of her hair in two and braided the two sides,
It looks crooked here, but it's not, it's just the angle of the picture


 Once the back is in two braids, I began curling the pieces on top near the spout of the bottle,
K has joined us now! :)

 You want to curl these sections under, to make it look like the hair is ribbon on top of a Christmas present.


 I bought lots of supplies from the dollar store and just used some ribbon to tie around the top of the bottle so it's not visible,
I also added little Christmas ribbons with twist ties on the ends of the braids before bringing the braid up and bobby pinning it to the side.
Once the braid is bobby pinned up, you'll want to curl the ends of the braids under as well
Once done I sprayed LOTS of hair spray to keep it all in place


 Here's a great side shot of what it looks like when it's all done!

 I didn't do step by step pics of her make-up,
My sister gets all credit for the make up! she worked on that while I did B's hair, spoiled girl!
she did peach blush, with silver sparkles on her cheeks and eyes
she also added false lashes as Cindy Lou Who has LOOONG lashes :)

There you have it! Cindy Lou Who hair!
It took me just over an hour to complete her look, this doesn't include dressing time as she slept in these PJ's the night before to make life easier on all of us.


 Just to give you an idea, this was her hair at lunch time about 5-5.5 hours later.
It still held up very well throughout the day!
Our waitress even asked to touch it haha


Glucose test, Proof I don't always cook fancy dinners ;), and Footloose the children's book!

  These past couple days have been so busy, but the week is almost done!
Had to do my glucose test yesterday, which any of you who are moms know, that is not fun. Thankfully the 3rd time has been the easiest one yet! I remember during my first pregnancy I was so nauseated and light headed I was sure I was going to pass out.
The Medical Assistant kept saying "Deep breaths cause if you throw up you have to do the 3 hour test". It took all the willpower I could possibly muster to not throw up, I could barely keep it together for an entire hour there was NO WAY I wanted to drink that nasty drink again and wait 3 hours!
So, I got through it and the glucose results were fine.
By the time I had my second baby the glucose drink was clear, no longer a red for fruit punch flavor or an orange for orange flavor.
I'm convinced that somehow the no added coloring helped take the edge off the nausea.
It was there the second time, as well as this third time, but nowhere near as bad as that miserable first time.

Here's the disgusting drink, that is no longer colored for those mommies whose babies are a little older then mine and haven't seen it ;)


   I find it kind of crazy that each doctors office does their glucose test differently.
This is baby number 3 also doctors office, city, and hospital number 3, all of my kids will have been born in different cities (one in a different state), by 3 different medical offices.
So 3 pretty different experiences as far as medical staff and offices are concerned.
I would say this 3rd glucose test was the most inconvenient, I had to drink the nasty liquid
(NOT given a choice in flavor by the way!) in 5 minutes, go see the midwife for a routine prenatal check up, then wait the rest of the hour in the waiting room until my blood could be drawn all with my 21 month old daughter, K.
My K is my sweet, very busy girl, she is my 'march to the beat of her own drum' girl and does not like being confined or being told what to do. She's also very loud when she's angry, so if she doesn't like something everyone in about a mile radius will hear about it.
I do have to say while it wasn't an easy appointment having to wait so long she did very well!
I think what really helped with her behaving was that this office has toys in the exam rooms and also in the waiting room there are toys along with a play kitchen.
The kitchen is right up my K's alley, she LOVES playing kitchen right now and it's so fun seeing her pretend and get excited over playing and exploring.
So, thank you to my OB's office for making an inconvenient time more tolerable by having things to keep my toddler entertained.


   Unlike my first OB office where children were forbidden!
I always thought that was bizzare, didn't effect me much back then but I thought that was weird that a doctors office who helps keep babies healthy in utero and delivers babies does not allow children into their office (see? very different offices).
Anyways, glucose test is done and results there were normal.
Once I finished the nasty liquid I felt as if I could go days without sugar and be completely fine. Well, once I got home I finished several bottles of water in about an hour to flush out the nauseating sugars that felt like they were taking over my body with jitters and exhaustion.
Once I drank tons of water I then began to crave sweets again, Oh pregnancy how strange you are!
I also felt pretty drained after the glucose test and did not feel like doing much of anything at home.

  Which brings me to a special section for those of you who think I always make special, home-made, "gourmet" meals for my girls even though my husband isn't usually home for them.
Appearances are nice but let me show you truth:
I give you my mid-week specialty; Kraft Macaroni and Cheese with a side/dessert of strawberries!
I will admit, I always add a little bit of extra cheese for a little extra yumminess to an easy dinner ;)
I can't ever just follow a recipe, especially a boxed one, I have to do something to make it my own.
I don't think I've ever not done that.


   My girls LOVE strawberries, they polish off an entire container in one sitting.
That's the one thing they both love and I can't keep enough of at home.
I kind of have to hide them though cause they don't eat one or two berries it's like once they start they don't stop, there's no control when strawberries are involved.


   Also, tonight was an easy meal, we had leftover waffles from like a month ago that we had frozen.
I heated those up with some sausage and we had "Breakfast for Dinner".
I love this age, my 5 year old thinks something is special when it's a little different or out of the ordinary. She's asked for a breakfast for dinner night for about a week now and I'm glad I saved it for tonight when I needed both an easy meal and to not feel guilty about an easy meal.
Definitely a win win, easy dinner which made me look like super mom to my 5 year old.
Can't get better than that!

   Bedtime for the girls is 6:30 pm, I know that sounds insane and I promise I will dedicate an entire post to that later.
Since They're in bed early I can work on this blog and have some me wind-down time.
I have the girls in the same room this week for the first time which is still an adjustment, they are both still waking up at night but it's getting easier to calm them back down and get them back to sleep so there's a positive I can already see coming from sharing a room.


   We always read before bed and I had to share with you this book we got a couple days ago from the library. It's called Footloose! Yes, like the movie Footloose...which is one of my favorites!
I didn't pay too much attention to the book when Brielle handed it to me at the library, just looked like a cute animal book with lots of brightly colored pictures.
We read it last night before bed and both girls asked that I read it again tonight.
Tonight is when I noticed there's a CD with it, Guess what?! It's Kenny Loggins singing Footloose with the lyrics changed a little bit to make it a zoo, kid story version.
The story is about animals in a zoo dancing once the zoo's closed.
So funny! My girls LOVED the song, we listened and danced to it 3 times before bed.
   My parents actually met after seeing the original Footloose in theatre back in the 80s.
So that movie is special to them in a way, I was introduced to the soundtrack at a young age and always enjoyed the music, I loved the movie after I saw it and now my girls already love the "kid version" Footloose.
It's so much fun seeing similarities in families, even the little things like music enjoyed.
Here are a couple photos of kids Footloose.


   I'm so ready for a fun weekend! Tomorrow B has her first read-a-thon which is a way to raise money for books at her school.
The fun part is the whole school gets to dress up as a literary character, she chose Cindy Lou Who from How The Grinch Stole Christmas! I'm so excited! It's one of my favorite stories and now one of hers too.
We have to wake up super early to make the costume and hair perfect but it will be worth it!
Stay tuned for lots of pictures and how to do Cindy Lou Who hair.


Chicken Cordon Bleu Soup

Hey there! I'm sharing one of my favorite recipes with you all. It's Chicken Cordon Bleu soup! If you love Chicken Cordon Bleu an...